
Perfect for first-time fermenters who want gut-healthy snacks without the intimidation.
Just cucumbers, salt, water, and a jar—no vinegar, no canning, no stress.
Follow this beginner-friendly guide for tangy, crispy pickles in less than a week!
Making lacto-fermented pickles for beginners might sound complicated, but here’s the truth: if you can mix salt and water, you can make these pickles. I learned this lesson the hard way after years of overthinking fermentation in restaurant kitchens. Then one summer, my neighbor handed me a jar of her homemade fermented pickles, and everything changed. They were crispy, tangy, and bursting with that complex flavor you just can’t get from vinegar pickles. Best part? She made them in her kitchen with nothing more than cucumbers, salt, and patience.
That experience sent me down a fermentation rabbit hole, and I’ve been making lacto-fermented pickles for beginners ever since—testing ratios, experimenting with spices, and figuring out exactly what works for home cooks who’ve never fermented anything before. The result is this foolproof guide that strips away the mystery and gives you confidence to start your fermentation journey.
Why You’ll Love This Recipe
First off, these pickles are alive—literally. Unlike store-bought pickles preserved in vinegar, lacto-fermentation creates beneficial bacteria that support your gut health. Meanwhile, you’re getting that same satisfying crunch and tangy flavor without any of the harsh acidity.
Additionally, this recipe is incredibly forgiving. You don’t need special equipment, pH strips, or a temperature-controlled environment. Consequently, it’s perfect for anyone who’s been intimidated by fermentation but curious about its benefits. I’ve taught this method to dozens of people, and every single one has succeeded on their first try.
Moreover, the flavor development is something special. As the pickles ferment, they develop layers of complexity that vinegar just can’t replicate—a slight funk, a natural effervescence, and a depth that makes each bite interesting. Plus, you’ll have leftover brine that’s packed with probiotics and makes an incredible addition to salad dressings or even a quick health shot.
Finally, there’s something deeply satisfying about creating food that transforms itself. You’re not just preserving cucumbers; you’re cultivating an ecosystem of beneficial bacteria that does the work for you.
Related Recipes
Once you master this basic fermentation technique, you’ll want to explore these other probiotic-rich recipes:
- Fermented Garlic Oil for Heart and Gut Health
- Simple Fermented Garlic Honey Recipe
- Easy Fermented Garlic Butter Recipe
How To Make Lacto-Fermented Pickles for Beginners
What You’ll Need
For the pickles:
- 2 pounds pickling cucumbers (small, firm, 4-5 inches long)
- 3 tablespoons fine sea salt
- 4 cups filtered water (room temperature)
- 6-10 garlic cloves, sliced
- 2-3 large sprigs fresh dill (or 2 tablespoons dill seeds)
- 1 tablespoon black peppercorns
- 1 tablespoon mustard seeds
- 1 teaspoon coriander seeds
- 2-3 grape leaves, oak leaves, or horseradish leaves (optional, for crispness)
- 2-3 dried red chili peppers (optional, for heat)
Equipment:
- One half-gallon mason jar (or two quart jars)
- Fermentation weight or small zip-lock bag
- Cheesecloth or coffee filter
- Rubber band

Step 1: Prepare Your Cucumbers
Start by washing your cucumbers thoroughly under cold water. Then, trim off about 1/16 inch from the blossom end—this is crucial because that end contains enzymes that can turn your pickles mushy. (The blossom end is opposite the stem, usually with a small raised dot.) Next, place the cucumbers in a bowl of ice water for 30 minutes. This step firms them up and helps ensure that final satisfying crunch.
Step 2: Mix Your Brine
While the cucumbers soak, dissolve the salt completely in the filtered water. Stir well until you can’t see any salt crystals. This 3% brine is the magic ratio for lacto-fermented pickles for beginners—strong enough to prevent bad bacteria but mild enough to encourage the good ones. Consequently, your pickles will ferment safely while developing that perfect tangy flavor.

Step 3: Pack Your Jar
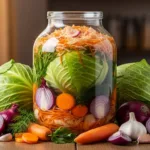
Now comes the fun part. First, place your spices at the bottom of your clean jar—peppercorns, mustard seeds, and coriander seeds. Then add half the garlic and half the dill. If you’re using grape leaves, tuck one along the side of the jar. These leaves contain tannins that help keep pickles crisp during fermentation.
Pack your cucumbers vertically in the jar, fitting them as tightly as possible without crushing them. Halfway through, add more garlic, dill, and another grape leaf if using. Continue packing until the jar is full, leaving about 2 inches of headspace at the top. Tuck in any remaining dill and the dried chilies if you want a little kick.
Step 4: Add the Brine and Weight
Pour your prepared brine over the cucumbers until they’re completely submerged, leaving about 1 inch of headspace. This is critical—any cucumber exposed to air can develop mold. Place a fermentation weight on top, or fill a small zip-lock bag with water and press it down to keep everything submerged.
Cover the jar with cheesecloth or a coffee filter secured with a rubber band. This allows gases to escape during fermentation while keeping out dust and fruit flies. Alternatively, you can use a regular lid but leave it very loose—you’ll need to “burp” the jar daily to release built-up pressure.

Step 5: Ferment and Wait
Place your jar in a cool, dark spot away from direct sunlight—ideally between 65-75°F. A kitchen counter away from the stove works perfectly. Now, the hardest part: waiting.
Check your jar daily. Within 24-48 hours, you should see tiny bubbles rising to the surface. This means fermentation has started. Furthermore, the brine will become cloudy—that’s exactly what you want. Those clouds are billions of beneficial bacteria doing their job.
After 3-4 days, taste a pickle. It should be tangy and slightly sour but still crisp. If you prefer more tang, let them ferment another day or two. However, keep in mind that longer fermentation means softer pickles. I usually find the sweet spot at day 4, but this varies depending on your kitchen temperature.
| Stage | Time | Appearance | What’s Happening |
|---|---|---|---|
| Initial Drying | 7–10 days | Firm blocks, surface cracks | Moisture evaporates and the outer layer hardens |
| Meju Fermentation | 6–8 weeks | White or greenish mold, earthy aroma | Beneficial molds and bacteria break down proteins |
| Brine Aging | 2–3 months | Darker liquid, softened chunks | Flavor matures and deep umami develops |
Step 6: Refrigerate
Once your pickles reach the flavor you like, transfer the jar to the refrigerator. The cold temperature slows fermentation dramatically, essentially pausing the process. Your lacto-fermented pickles for beginners will continue developing flavor slowly but will stay crispy and delicious for months.
How to Store and Serve Lacto-Fermented Pickles for Beginners
Store your finished pickles in the refrigerator with the lid loosely fastened. They’ll keep for 6-12 months, though in my experience, they rarely last that long. The flavor will continue to deepen over time, becoming more complex and funky in the best possible way.
Always use clean utensils when removing pickles from the jar. This prevents introducing unwanted bacteria that could cause spoilage. Additionally, make sure pickles remain submerged under the brine—if the level drops, top it off with a simple saltwater solution (1 teaspoon salt per cup of water).
Serve these pickles as a crunchy snack, slice them for sandwiches, chop them into potato salad, or enjoy them alongside grilled dishes. Moreover, don’t throw away that brine! It’s liquid gold—full of probiotics and flavor. Use it as a base for salad dressings, add a splash to cocktails (seriously, try it in a Bloody Mary), or drink a small shot for a gut-health boost.
Expert Tips for Success
Choose the right cucumbers. Pickling cucumbers (also called Kirby cucumbers) work best because they’re bred to stay crisp. Regular slicing cucumbers contain more water and tend to get mushy. Look for small, firm cucumbers with bumpy skin. If you can only find larger ones, cut them into spears—they’ll ferment faster but still taste great.
Temperature matters more than you think. Fermentation speeds up in warmer temperatures and slows down in cooler ones. Consequently, your 4-day pickles in a 75°F kitchen might take 6-7 days in a 60°F basement. Check them daily and trust your taste buds rather than following a strict timeline.
Don’t panic about white film. If you see a thin white layer forming on the surface, that’s kahm yeast—harmless but unappealing. Simply skim it off with a clean spoon and continue. However, if you see fuzzy mold in colors like green, black, or pink, that’s a different story. Toss the batch and start over, making sure everything is properly submerged next time.
Test your salt. Not all salt is created equal. Fine sea salt dissolves easily and measures consistently. Avoid iodized table salt, as the iodine can interfere with fermentation. Similarly, coarse kosher salt is fine but requires different measurements—if you’re using it, you’ll need about 4.5 tablespoons instead of 3.
The blossom-end trim is non-negotiable. I’ve tested batches with and without this step, and it makes a dramatic difference. Those enzymes really do soften pickles during fermentation. Additionally, the ice water soak helps, though it’s less critical than the trim.
Start tasting early. Everyone’s preference for sourness differs. I love my pickles at day 4, but my wife prefers day 3, and my dad won’t touch them until day 7. Check them daily starting on day 3, and move them to the fridge when they taste right to you.
Recipe Variations
Spicy Dill Pickles: Double the dried chilies and add 1 teaspoon of red pepper flakes to the spice mix. For extra heat, slice a fresh jalapeño and layer it between the cucumbers.
Garlic Lover’s Pickles: Increase the garlic to 15-20 cloves. The fermentation mellows garlic’s harsh bite, transforming it into something sweet and complex. The fermented garlic itself becomes a delicious bonus ingredient.
Turmeric-Ginger Pickles: Add 2 teaspoons of ground turmeric (or a 2-inch piece of fresh turmeric root, sliced) and a 2-inch piece of fresh ginger, sliced thin. This creates a beautiful golden brine and adds anti-inflammatory compounds.
Mediterranean Pickles: Replace the dill with fresh oregano and add 1 tablespoon of fennel seeds. Include lemon zest from one lemon for a bright, herbaceous flavor.
Sweet and Spicy Pickles: Add 2 tablespoons of honey to the brine along with extra chilies. The bacteria will consume most of the sugar during fermentation, leaving just a subtle sweetness that balances the heat beautifully.
Half-Sours: If you prefer milder pickles that taste closer to fresh cucumbers with just a hint of fermentation, refrigerate them after just 2-3 days. These are popular in Jewish delis and have a lighter, fresher flavor.
FAQs
Also Try
If you enjoyed making these fermented pickles, you’ll love these other simple recipes:
- Fermented Garlic Safety
- Your Friendly Guide to Cucumber Fermentation
- The Complete Guide to Vegetable Fermentation
Conclusion
There’s something magical about creating food that literally comes alive in your kitchen. These lacto-fermented pickles for beginners prove that fermentation doesn’t have to be complicated or intimidating—it just requires patience, clean equipment, and trust in the process. After you nail your first batch, you’ll understand why people have been fermenting vegetables for thousands of years. The flavor is incomparable, the health benefits are real, and the satisfaction of creating probiotic-rich food from scratch is genuinely rewarding.
Start with this basic recipe, and once you’ve mastered it, experiment with different spices, vegetables, and fermentation times. Before long, you’ll have multiple jars bubbling away on your counter, each one a small ecosystem working its magic.
Now grab some cucumbers, mix up that brine, and join the centuries-old tradition of fermentation. Your gut will thank you.
Recipe by William Hardin, a Portland, Maine-based chef who believes the best recipes honor simple ingredients and time-tested methods.
Print
Lacto-Fermented Pickles for Beginners: Easy Step-by-Step Guide
- Total Time: PT4D15M
- Yield: 1 half-gallon jar (about 2 pounds pickles) 1x
Description
Crunchy, tangy lacto-fermented pickles made with just cucumbers, salt, water, and spices. This beginner-friendly method creates probiotic-rich pickles without vinegar or special equipment.
Ingredients
- 2 pounds pickling cucumbers (small, firm, 4–5 inches long)
- 3 tablespoons fine sea salt
- 4 cups filtered water (room temperature)
- 6–10 garlic cloves, sliced
- 2–3 large sprigs fresh dill (or 2 tablespoons dill seeds)
- 1 tablespoon black peppercorns
- 1 tablespoon mustard seeds
- 1 teaspoon coriander seeds
- 2–3 grape leaves, oak leaves, or horseradish leaves (optional, for crispness)
- 2–3 dried red chili peppers (optional, for heat)
Instructions
- Wash cucumbers thoroughly and trim 1/16 inch from blossom end. Soak in ice water for 30 minutes.
- Dissolve salt completely in filtered water to create a 3% brine. Stir until no salt crystals remain.
- Place spices (peppercorns, mustard seeds, coriander) at bottom of clean half-gallon jar. Add half the garlic and dill, plus one grape leaf if using.
- Pack cucumbers vertically in jar as tightly as possible. Halfway through, add more garlic, dill, and another grape leaf. Continue packing, leaving 2 inches headspace.
- Pour brine over cucumbers until fully submerged, leaving 1 inch headspace. Place fermentation weight on top to keep cucumbers submerged.
- Cover jar with cheesecloth secured with rubber band, or use loose lid. Place in cool, dark spot (65-75°F).
- Check daily for bubbles and cloudiness (signs of fermentation). Taste after 3 days. Continue fermenting until desired sourness is reached, typically 4-5 days.
- Once pickles reach preferred flavor, transfer jar to refrigerator. Store for 6-12 months, keeping cucumbers submerged under brine.
Notes
Temperature affects fermentation speed—warmer kitchens ferment faster. Trim the blossom end to prevent mushy pickles. Use fine sea salt, not iodized salt. White film (kahm yeast) is harmless; skim it off. Fuzzy colored mold means discard and start over. Fermented garlic is delicious—eat it too!
- Prep Time: PT15M
- Cook Time: PT0M
- Category: Fermented Foods, Side Dish
- Method: Fermentation
- Cuisine: American
Nutrition
- Serving Size: 1 pickle (about 100g)
- Calories: 15
- Sugar: 2g
- Sodium: 450mg
- Fat: 0g
- Saturated Fat: 0g
- Unsaturated Fat: 0g
- Trans Fat: 0g
- Carbohydrates: 3g
- Fiber: 1g
- Protein: 1g
- Cholesterol: 0mg
Keywords: lacto-fermented pickles, fermented pickles, probiotic pickles, homemade pickles, fermentation for beginners, gut health, no vinegar pickles
Sources
- USDA Food Safety and Inspection Service – Fermented Foods
- National Center for Home Food Preservation – Fermentation
- Harvard T.H. Chan School of Public Health – The Gut Microbiome
- Food Safety – Lacto-Fermentation

 19")

 21")