
Want to make probiotic pickles at home? It’s honestly way easier than it sounds! It takes less than five days, and you just need a few simple things you probably already have.
Store-bought probiotic pickles are full of vinegar and preservatives, but when you make your own, you’re using this old-school method that’s been around forever. You end up with crunchy, tangy cucumbers that are loaded with good bacteria for your gut. And they taste amazing.
What Are Probiotic Pickles?
The Science Part (But Simple)
Lacto-fermentation sounds fancy, but it’s pretty straightforward. You put cucumbers in salty water, and these helpful bacteria called Lactobacillus go to work. They eat the sugars and make lactic acid. That acid is what gives pickles their tang and keeps them from spoiling.
This whole thing creates billions of good bacteria. Real fermentation takes time, but you get vegetables packed with enzymes, vitamins, and probiotics that help your digestion.
What They Do for You
These pickles aren’t just snacks—they’re actually good for you. The bacteria help your digestion work better and boost your immune system. Less bloating, better nutrient absorption, all that stuff. Probiotic pickles deliver these benefits with every crunchy bite.
Fermentation increases vitamin content too, especially B vitamins and vitamin K. Plus it makes enzymes that help your body grab more minerals. Some studies show probiotic foods might help with mood, lower inflammation, and support healthy weight. Not bad for a pickle.
Essential Ingredients You’ll Need
Making probiotic pickles starts with choosing the right ingredients.
The Right Cucumbers Matter
This is where people screw up. You need pickling cucumbers like Kirby or Persian varieties. They’ve got thicker skins, smaller seeds, and less water. They stay crunchy instead of getting mushy.
Don’t use regular slicing cucumbers—those get soft and gross. Pick firm ones without soft spots and use them within a day. Always cut off the blossom end (the lighter, smoother end). It has enzymes that make pickles soft.

Salt, Water, and Flavor
Your brine needs to be right. Use sea salt, kosher salt, or pickling salt. Never iodized table salt—it has stuff that kills the good bacteria.
You want 2-3% salt. That’s about 1 heaping teaspoon per cup of filtered water. Don’t use chlorinated tap water because it kills bacteria. Filtered, spring, or well water works.
For seasonings, go with fresh dill, garlic cloves, peppercorns, mustard seeds, and bay leaves. Grape leaves or oak leaves add tannins that keep pickles crunchy.
The Simple 5-Day Process
Days 1-2: Starting Out
Wash your cucumbers and trim the blossom ends. Mix your brine—for a quart jar, use 2 tablespoons salt with 2 cups filtered water. Stir until dissolved.
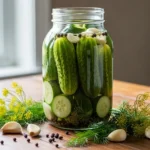
Put aromatics in the bottom of a clean mason jar—fresh dill, 3-4 garlic cloves, and a teaspoon each of peppercorns and mustard seeds. Pack cucumbers in tight, leaving an inch at the top. Pour brine over everything until covered.
Keep the cucumbers underwater with a weight. Cover with an airlock lid or a regular lid twisted on loose. Put it somewhere cool and dark. Within 24-48 hours, you’ll see bubbles forming.
Days 3-5: Active Fermenting
By day three, it should be bubbling. The brine gets cloudy—that’s normal and good. Cucumbers change from bright green to olive-ish. If using a regular lid, open it daily to let gases out.
Start tasting on day three. Like your probiotic pickles mild and extra crunchy? Put them in the fridge now. Want more tang? Keep fermenting through day five, tasting daily until they’re how you want them.

Achieving Perfect Texture
Staying Crunchy
Cut off blossom ends every time. Use fresh, firm pickling cucumbers. Keep everything underwater with weights because air makes them soft.
Keep the temperature between 64 and 72°F. Warmer ferments faster but can mess with texture. Cooler keeps things crisper. Add grape leaves or loose tea for extra crunch. Don’t go past seven days at room temperature, or they’ll lose their snap.
Different Flavors
After you’ve got the basics down, experiment. Classic garlic dill is fresh dill with whole garlic cloves for that traditional flavor.
Want heat? Add red pepper flakes or fresh jalapeños. Try coriander seeds, caraway, or fennel for depth. I’ve made batches of probiotic pickles with ginger and star anise—really good. You can also do different cuts: whole mini cucumbers, spears, or sliced rounds that ferment fastest.
Troubleshooting Common Problems
White Film and Mold
White film on top is usually kahm yeast—harmless. Just skim it off. Real mold is fuzzy and blue, green, or black. That’s contamination.
Small mold amounts on floating vegetables can be removed. Submerged pickles are usually fine. But if more than a third has mold, toss it. Prevention: keep vegetables underwater, use filtered water, maintain at least 2% salt, and store in a cool spot away from sunlight.
Soft Pickles
Soft or slimy means weak brine. Keep it at 2-3% salt. Not trimming blossom ends leaves softening enzymes. Old cucumbers or wrong varieties give bad texture. Fermenting above 80°F causes problems.
Use fresh-picked pickling cucumbers, proper salt levels, and controlled temperature, and be patient with your probiotic pickle-making.
Storage and Shelf Life
Refrigerating Properly
Once your probiotic pickles taste right, refrigerate them. Cold temps (34-40°F) slow fermentation while keeping probiotics alive. Remove weights, wipe the jar rim, and put on a tight lid.
Keep pickles under brine—top off with fresh 2% salt solution if needed. Stored right, they last 3-6 months refrigerated, best within three months.
Keeping Bacteria Alive
Beneficial bacteria stay alive if pickles stay raw and unpasteurized. They survive cold up to 143°F but die at 144°F. Use clean utensils, don’t double-dip, and keep jars sealed to limit air exposure.
Some bubbling in the fridge is normal—just slow fermentation. For best probiotic benefits and texture, eat them while crunchy and before six months.

Recipe Ingredients Table
| Ingredient | Amount | Purpose |
|---|---|---|
| Pickling Cucumbers | 1-2 lbs | Main vegetable |
| Sea Salt | 2 tbsp | Creates brine |
| Filtered Water | 2 cups | Brine base |
| Fresh Dill | 3-4 sprigs | Flavor |
| Garlic Cloves | 4-6 cloves | Flavor |
| Peppercorns | 1 tsp | Spice |
| Mustard Seeds | 1 tsp | Spice |
| Bay Leaf | 1-2 leaves | Flavor & tannins |
| Grape Leaves | 2-3 leaves (optional) | Maintain crispness |
Frequently Asked Questions
How do I know if my fermented pickles are safe to eat?
Look for bubbling, cloudy brine, and color change from bright green to olive. The brine should smell sour and tangy—never rotten. If pickles stayed underwater in proper salt brine (2-3%) and there’s no fuzzy mold in the jar, your probiotic pickles are safe to eat.
Can I use tap water for fermenting pickles?
Skip regular tap water—chlorine messes with the bacteria you need. Use filtered or spring water. If tap water’s your only option, leave it out uncovered for 24 hours so the chlorine evaporates. Water quality matters more than you’d think for probiotic pickle fermentation.
What’s the difference between half-sour and full-sour pickles?
Half-sour ferment for 3-5 days. They’re milder and super crunchy. Full-sour go 8-14 days, get more tangy, and are a bit softer. Both have probiotics, but longer fermentation makes more lactic acid.
Why did my pickles turn out soft?
Usually it’s from not cutting off the blossom end, using old cucumbers, not using enough salt, or fermenting above 80°F. Could also be using regular cucumbers instead of pickling ones or leaving them out too long before refrigerating.
Do fermented pickles need refrigeration?
Yep. Once they taste right, put them in the fridge. It slows things down and keeps quality good. Unlike vinegar pickles that sit on shelves, probiotic pickles are alive and need cold storage.
How long do homemade fermented pickles last?
They’ll last 3-6 months in the fridge, though they’re best in the first three months. They keep fermenting slowly and get tangier. As long as they stay under brine and don’t show spoilage, they’re safe past six months—they just might not taste as good.
Conclusion
Making probiotic pickles at home is way simpler than most people think. Five days gets you crunchy, tangy cucumbers packed with good bacteria that beat anything you’ll find in stores. Just use quality cucumbers, get your salt ratio right, and follow the basic steps.
The cool thing about fermentation is how simple it really is—cucumbers, salt, water, and time. That’s it. These probiotic pickles are worth the minimal effort. Start with this basic recipe, nail down the technique, then mess around with different seasonings until you find what you love. Your gut will thank you.
Print
How to Make Probiotic Pickles in Under 5 Days
- Total Time: 5 days
- Yield: 1 quart jar 1x
- Diet: Vegan
Description
Learn how to make probiotic pickles in under 5 days with this simple lacto-fermentation process. These crunchy, tangy cucumbers are loaded with beneficial bacteria that improve gut health and taste amazing.
Ingredients
- 1–2 lbs pickling cucumbers (Kirby or Persian)
- 2 tbsp sea salt
- 2 cups filtered water
- 3–4 sprigs fresh dill
- 4–6 garlic cloves
- 1 tsp peppercorns
- 1 tsp mustard seeds
- 1–2 bay leaves
- 2–3 grape leaves (optional, for crispness)
Instructions
- Wash cucumbers and trim off blossom ends.
- Mix 2 tbsp salt with 2 cups filtered water to make brine.
- Place dill, garlic, peppercorns, mustard seeds, and bay leaves in a clean mason jar.
- Pack cucumbers tightly into the jar, leaving 1 inch of headspace.
- Pour brine over cucumbers until fully submerged.
- Weigh cucumbers down to keep them under brine and cover loosely with a lid.
- Store in a cool, dark place at 64–72°F.
- After 24–48 hours, bubbles should form as fermentation starts.
- On days 3–5, taste daily—refrigerate when pickles reach desired tang and crunch.
- Store in the fridge for up to 3–6 months, keeping pickles submerged in brine.
Notes
Use firm pickling cucumbers and non-iodized salt. Keep cucumbers submerged to prevent mold. For extra crunch, add grape leaves or loose tea. Store fermented pickles in the fridge to preserve probiotics.
- Prep Time: 15 minutes
- Cook Time: 0 minutes
- Category: Fermented Foods
- Method: Lacto-Fermentation
- Cuisine: Homemade
Nutrition
- Serving Size: 1 pickle
- Calories: 10
- Sugar: 0g
- Sodium: 250mg
- Fat: 0g
- Saturated Fat: 0g
- Unsaturated Fat: 0g
- Trans Fat: 0g
- Carbohydrates: 2g
- Fiber: 1g
- Protein: 0g
- Cholesterol: 0mg
Keywords: probiotic pickles, fermented pickles, lacto fermentation, gut health, homemade pickles
Sources
- Feasting at Home – Fermented Pickles with Garlic and Dill
- iDie’s Farm – How to Make Easy Homemade Fermented Dill Pickles
- Scratch Mommy – Easy Fermented Pickles (No Vinegar!)
- Fermenting for Foodies – Grandma’s Fermented Dill Pickles
- Zero Waste Homestead – Lacto Fermented Dill Pickle Recipe
- Ethan Chlebowski – Noma Guide to Lacto Fermented Pickles
- Harvard Health – Fermented foods for better gut health
- The Good Bug – Fermented Pickles: Pros and Cons for Gut Health
- Dr. Axe – Fermented Pickles Benefit the Gut, Skin, Brain & More
- Wholeistic Living – Probiotic Pickles: Ultimate Guide
- NC State Extension – Pickle and Pickle Product Problems
- Olive My Pickle – 7 Common Questions About Lacto Fermentation
- Fermented Food Lab – How to prevent mold when fermenting vegetables
- Fermenting for Foodies – Preventing Kahm Yeast and Mold
- Gurney’s – Best Cucumbers for Pickling
- Olive My Pickle – How to Care for Your Fermented Foods
- Cleveland Clinic – Is Pickle Juice Good for You?
- The Prairie Homestead – Homemade Fermented Pickle Recipe