
So you want to learn how to ferment vegetables? Trust me, it’s way simpler than it sounds, and honestly, the results are going to blow your mind—both in the kitchen and for your gut health. Vegetable fermentation is basically this super old preservation trick that people have been using forever, like literally thousands of years, all around the world. Whether you’re trying to save your garden haul, improve your digestion, or just want to geek out on traditional cooking methods, vegetable fermentation is where it’s at. And here’s the kicker: you only need a couple basic things and some patience. That’s it!
What’s This Lacto-Fermentation Thing Anyway?
Okay, when people talk about vegetable fermentation, they’re usually talking about lacto-fermentation. It’s this cool process where good bacteria turn your fresh veggies into these tangy, probiotic-packed treats. Now don’t freak out about the “lacto” part—it’s got nothing to do with milk or dairy. The “lacto” just means lactic acid, which is what gets created during the whole thing.
Here’s what’s actually happening: it’s a natural preservation method that uses lactobacillus (that’s the good bacteria that’s already chilling on your vegetables) working together with salt to create this perfect little environment. The good microbes get to party while the bad bacteria can’t even survive. Pretty clever, right?
The Cool Science Behind It
The science here’s actually pretty fascinating if you’re into that sort of thing. During vegetable fermentation, these helpful bacteria munch on the sugars in your veggies and turn them into lactic acid. This whole acidification thing doesn’t just preserve your food—it actually makes it more nutritious! The vitamins and minerals become easier for your body to absorb. So yeah, you’re basically upgrading your vegetables.
Discover great ideas likes: Stop Tossing That Sauerkraut Juice Down the Drain
Salt: Your New Best Friend
Let me tell you, salt is absolutely crucial for successful vegetable fermentation. It’s not just there to make things taste good (though it does that too). Salt’s the boss that controls the whole fermentation process by creating this selective pressure situation. Basically, it lets the good bacteria thrive while keeping the spoilage stuff away.
You’ll want a salt concentration somewhere between two and five percent by weight. If you’re just starting out, go with a simple two-percent brine—it works like a charm. Just mix 20 grams of salt into one liter of non-chlorinated water. (And yeah, non-chlorinated matters because chlorine will mess with your good bacteria.)
Here’s a quick reference table for common brine concentrations:
| Water Volume | 2% Salt | 3.5% Salt | 5% Salt |
|---|---|---|---|
| 500 ml | 10g | 18g | 25g |
| 1000 ml | 20g | 35g | 50g |
| 2000 ml | 40g | 70g | 100g |

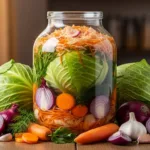
Alright, so getting started with vegetable fermentation at home is ridiculously simple—you barely need any equipment. Just grab a clean mason jar, some fresh veggies, salt, water, and if you’re feeling fancy, throw in some herbs or spices. First things first: wash your vegetables really well and decide how you want to cut them. Slices, sticks, chunks—honestly, they all work great. I’d suggest starting with carrots, cucumbers, radishes, broccoli, or cauliflower since they’re super forgiving, but the truth is, pretty much any veggie is going to ferment just fine.
Next up, make your brine by dissolving salt in cool water (filtered is better if you’ve got it). Pour that brine into your sterilized jar until the veggies are totally covered—and I mean completely submerged. This part’s crucial because any vegetables sticking out above the water line can get moldy, and trust me, you don’t want that. You can use a fermentation weight, a smaller jar nestled inside, or even just tuck a cabbage leaf on top to keep everything underwater. Whatever works!
The Three Stages of Veggie Magic
Understanding these stages will make you feel like a total fermentation pro. Vegetable fermentation goes through three overlapping phases, and they’re pretty cool to watch. During days zero to two, the environment’s becoming anaerobic as the oxygen gets used up. You won’t notice much happening yet, but those beneficial bacteria are definitely waking up and stretching.
Then days two through five? That’s when things get exciting. This is the dynamic phase where lactobacillus takes over, and you’ll see vigorous bubbling and the brine getting all cloudy. It’s alive! Finally, from weeks two through six, you’ve got the maturation phase, where those complex flavors develop and your ferment mellows out, getting tangier and tangier depending on how long you let it go.
Learn more about: 7 Creative Kimchi Variations to Spice Up Your Meals

How Long Should You Actually Ferment This Stuff?
Here’s the thing about vegetable fermentation: there’s no hard-and-fast timeline, which is actually pretty great. Most veggies hit that nice pleasant tartness somewhere between five and ten days at room temperature. But honestly, it really depends on how warm your kitchen is. At the sweet spot of sixty to seventy degrees Fahrenheit, you’ll get wonderful complexity within two to six weeks. If it’s warmer, things move way faster—sometimes you’re done in just three to four days. Cooler temps? Well, you might be waiting weeks or even months.
The real test is just tasting it. Pop open your jar after day four or five and try a piece. Like what you taste? You’re done! Want it more sour? Let it keep going. This whole personal preference thing means you’ll figure out your perfect fermentation time pretty quickly.
Want to Speed Things Up? Here’s How
Looking for faster results? Temperature is your best friend here. If you keep your ferments at seventy to seventy-five degrees Fahrenheit, they’ll move along way quicker. You can also use a starter culture—either buy some commercial lactobacillus powder or use liquid from a previous batch you made (that’s called back-sloping, which sounds way fancier than it is). This jumpstarts everything by introducing active bacteria right away instead of waiting for wild fermentation to kick in.
Back-sloping’s actually super clever: just save some liquid from a finished ferment and use it to get new batches going. Not only does this speed things up, but it also keeps your results consistent since you’re working with bacteria you already know work well. It’s like sourdough starter for veggies!
The Best Veggies to Ferment (For Maximum Health Benefits)
While pretty much any vegetable is going to ferment successfully, some choices just give you more bang for your buck nutrition-wise. Cabbage is the absolute champion here—it’s loaded with nutrients that fermentation actually amplifies, especially vitamin K and beneficial enzymes. Carrots bring this natural sweetness that balances out fermentation’s tartness beautifully. Radishes ferment super fast and keep their crispy texture wonderfully. And broccoli, cauliflower, and green beans? They create these delightfully crunchy ferments that are just chef’s kiss.
Oh, and definitely mix vegetables together! Try carrots with cauliflower or radishes with dill and garlic. These combos create really complex flavor profiles while boosting the probiotic content through microbial diversity. Basically, more variety equals more good bacteria.
Discover great ideas like: How to Make Probiotic Pickles in Under 5 Days

Common Mistakes to Avoid (Learn from Others’ Failures!)
Look, several mistakes can totally derail your vegetable fermentation efforts, so let’s talk about what NOT to do. Never let vegetables pop up above the brine—those exposed bits will develop mold crazy fast. Don’t use chlorinated tap water straight from the faucet; that chlorine can mess with fermentation. And avoid glass jars with metal lids that touch the brine because the acid corrodes metal (plastic lids are totally fine though).
If your ferment smells really nasty—like rotting instead of pleasantly sour—just toss it. Fuzzy mold throughout, sliminess, or pink discoloration all mean spoilage. These warning signs tell you something went wrong, usually oxygen exposure or contamination.
Temperature extremes will also sabotage things. Freezing stops the process completely, while heat above eighty degrees Fahrenheit makes your veggies too soft too fast and creates these overly sharp, unpleasant flavors. Not good.
FAQs
Conclusion
So here’s the deal: vegetable fermentation really doesn’t require any special skills or fancy equipment—just salt, veggies, water, and a little patience. You’ve now got everything you need to start fermenting at home, and honestly, that’s pretty exciting! Whether you ferment for five days or five weeks, the process stays beautifully simple: submerge your vegetables in brine, keep them undisturbed, and let those beneficial bacteria do their thing.
The best part? Your first batch is going to teach you way more than any article ever could (even this one!). Start with something easy like cabbage or carrots, trust the process, and just adjust based on what you learn along the way. That’s literally how generations of cooks mastered vegetable fermentation, and that’s exactly how you’re going to nail it too. Now go make something delicious!
Print
The Complete Guide to Vegetable Fermentation: Master the Ancient Art of Preserving Your Veggies
- Total Time: 7 days
- Yield: Varies by batch size
- Diet: Vegan
Description
Master the ancient art of preserving your veggies through the simple, powerful process of vegetable fermentation. Learn everything from the science behind lacto-fermentation to brine ratios, stages of fermentation, and how to achieve perfect tangy, probiotic-packed results.
Ingredients
- Fresh vegetables (cabbage, carrots, radishes, broccoli, cauliflower, or green beans)
- Non-chlorinated water
- Quality sea salt
- Optional herbs and spices (dill, garlic, bay leaves, etc.)
- Mason jars or fermentation vessels
- Fermentation weights or cabbage leaves
Instructions
- Wash vegetables thoroughly and cut them into desired shapes (slices, sticks, or chunks).
- Prepare a 2% brine by dissolving 20g of sea salt into 1 liter of non-chlorinated water.
- Pack vegetables tightly into a clean, sterilized jar.
- Pour the brine over the vegetables until completely submerged.
- Use a fermentation weight, smaller jar, or cabbage leaf to keep everything under the brine.
- Cover loosely to allow gases to escape while keeping dust and debris out.
- Let ferment at room temperature (60–70°F) for 5–10 days or longer for deeper flavor.
- Taste after day 5; when tangy and flavorful, transfer to refrigerator to slow fermentation.
- Enjoy as a gut-healthy snack or condiment!
Notes
Use non-chlorinated water to protect beneficial bacteria. Always keep vegetables fully submerged in brine to prevent mold. Taste regularly to find your preferred level of tanginess.
- Prep Time: 30 minutes
- Cook Time: 0 minutes
- Category: Fermentation & Preservation
- Method: Lacto-Fermentation
- Cuisine: Global
Nutrition
- Serving Size: 1/2 cup
- Calories: 25
- Sugar: 2g
- Sodium: 300mg
- Fat: 0g
- Saturated Fat: 0g
- Unsaturated Fat: 0g
- Trans Fat: 0g
- Carbohydrates: 5g
- Fiber: 2g
- Protein: 1g
- Cholesterol: 0mg
Keywords: vegetable fermentation, fermented vegetables, lacto-fermentation, probiotics, gut health
Sources
- Advancing Insights into Probiotics During Vegetable Fermentation – NCBI PMC
- Fermented Foods, Health and the Gut Microbiome – NCBI PMC
- Advancing Insights into Probiotics during Vegetable Fermentation – PubMed NCBI
- Fermented Foods Can Add Depth to Your Diet – Harvard Health Publishing
- How Time & Temperature Affect Vegetable Fermentation – Cultures for Health
- How Do I Know When My Ferment is Done Fermenting – Mountain Feed
- How to Ferment Vegetables – Make Your Own Fermented Veggies – Running to the Kitchen
- Learn How To Ferment Vegetables – Oddbox
- Fermenting Vegetables: A Step-by-Step Guide – Explore Yeast
- How To Ferment Vegetables (And Ways To Use Them) – Olives for Dinner
- 6 Benefits of Fermented Vegetables, According To Science – Revolution Fermentation
- Fermented Vegetables Positively Impact Gut Health – University of Minnesota Twin Cities
- The Health Benefits of Fermented Foods, From Kimchi to Kefir – Cedars-Sinai
- Vegetable Fermentation – Virginia Tech VCE Publications
- Safely Fermenting Food at Home – USDA NIFA
- Top 7 Health Benefits of Fermenting – BBC Good Food
- Food Fermentation: Benefits, Safety, Food List, and More – Healthline
- How Long Can Fermented Foods Be Left to Ferment – Fermented Food Lab