Mini Cheesecakes
Indulging in a mini cheesecake is like taking a delightful trip through layers of creamy goodness, perfectly balanced with a hint of sweetness and a crunchy base. These little treats are not just visually appealing; they also pack a punch in flavor and are perfect for any gathering. Picture a warm evening, friends laughing around the table, and one perfect bite of cheesecake melting in your mouth. That’s the magic we’re creating here.
Why you’ll love this dish
These mini cheesecakes are a showstopper for any occasion! They come together quickly, making them an ideal treat for busy weeknights or special events. Their bite-sized nature means they’re perfect for sharing, and everyone can enjoy their own little dessert without the guilt of a full slice. Plus, they are endlessly customizable; you can top them with fresh fruits, chocolate, or even a drizzle of caramel for a delightful finish.
"These mini cheesecakes were a hit at my last gathering! Everyone loved how creamy they were. I’ll definitely make them again!" – Happy Home Cook
Preparing the dish
Making these mini cheesecakes is a simple and enjoyable process. You’ll begin by preparing a crunchy crust, then mix a rich and velvety cream cheese filling. Once everything is baked to divine perfection, a short cooling time is all they need before they shine at your dessert table. In about an hour, you can whip up a dessert that has the potential to become a family favorite.
Key ingredients
The star of this recipe is the cream cheese, which provides that heavenly richness we all crave in a cheesecake. Eggs help to create a smooth texture while adding structure. The crust, usually made from crushed graham crackers or cookies, offers the perfect crunchy counterbalance. If you’re looking for alternatives, you could use gluten-free cookies for a delicious crust or switch to a dairy-free cream cheese for a lighter version.
Directions to follow
Start by preheating your oven and preparing your cupcake or muffin tin with liners. Next, mix the graham cracker crumbs with melted butter until they resemble wet sand and press them firmly into the bottom of each liner. For the filling, blend cream cheese until it’s super smooth, then incorporate sugar, eggs, and vanilla extract. Spoon this luscious mixture over your crusts and bake until set. Allow the cheesecakes to cool down slowly, and don’t forget to chill them in the fridge for a few hours before serving to enhance their flavor!
Best ways to enjoy it
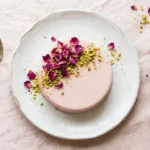
These mini cheesecakes are perfect for any occasion or meal. Serve them as a sweet finale to a family dinner, bring them to potlucks, or enjoy during a movie night at home. They can be garnished with fresh berries, a drizzle of chocolate sauce, or even a sprinkle of nuts for an added crunch. Present them on a beautiful platter, and watch as your guests can’t resist reaching for more.
Keeping leftovers fresh
If you find yourself with extras, no worries! Mini cheesecakes can be kept in the refrigerator for about 3 to 5 days. For longer storage, they freeze beautifully. Just wrap them in plastic wrap and place them in an airtight container or freezer bag. When you’re ready to enjoy them again, simply thaw them in the fridge overnight. They’ll be just as delicious as the day you made them!
Helpful cooking tips
For the best results, ensure your cream cheese is at room temperature before mixing; this helps achieve that silky-smooth texture. Don’t overmix your batter, especially after adding the eggs, to avoid incorporating too much air, which can lead to cracks in the cheesecake during baking. If you notice the tops puffing up slightly while baking, it’s all a part of the process; they’ll settle back down as they cool.
Creative twists
Feel free to get adventurous with flavor profiles! Try adding lemon zest for a citrusy touch, or mix in chocolate chips for a rich indulgence. You can also experiment with different crusts, such as Oreos or any cookie of your choice. If you’re feeling particularly creative, a layer of fruit preserves inside the cheesecake or on top can elevate these mini treats even further.
Common questions
- How long does it take to prepare? The preparation time is about 15-20 minutes, while baking takes around 15-20 minutes. Just remember to chill them afterward for at least 2 hours.
- Can I make them ahead of time? Absolutely! You can prepare these mini cheesecakes a day before your event, which makes hosting easier.
- What if I want to make them gluten-free? Use gluten-free cookies for the crust, and ensure your other ingredients are also gluten-free.
- How do I reheat them? It’s best to enjoy them chilled or at room temperature, so there’s no need to reheat!
- Can I scale the recipe? Yes, you can easily double or halve the ingredients based on how many mini cheesecakes you need. Just ensure your baking time is adjusted accordingly.

Mini Cheesecakes
Delight in these creamy mini cheesecakes, perfectly balanced with a crunchy base, ideal for sharing at any gathering.
- Total Time: 120 minutes
- Yield: 12 servings
Ingredients
- 1 ½ cups graham cracker crumbs
- ½ cup unsalted butter, melted
- 16 oz cream cheese, softened
- ½ cup sugar
- 2 large eggs
- 1 tsp vanilla extract
Instructions
- Preheat your oven to 325°F (160°C) and prepare a muffin tin with liners.
- Mix the graham cracker crumbs with melted butter until they resemble wet sand.
- Press the mixture firmly into the bottom of each liner.
- Blend the cream cheese until super smooth, then incorporate sugar, eggs, and vanilla extract.
- Spoon the mixture over your crusts and bake until set, about 15–20 minutes.
- Cool the cheesecakes slowly and then chill in the fridge for at least 2 hours before serving.
Notes
For best results, ensure cream cheese is at room temperature before mixing. Experiment with different toppings and crusts for variety.
- Prep Time: 20 minutes
- Cook Time: 20 minutes
- Category: Dessert
- Method: Baking
- Cuisine: American
- Diet: Vegetarian